My current website setup
Table of Contents
Since I started writing down notes about my website-setup some of the infrastructure changed. In the meantime I moved away from Github and host my personal Gitea instance on my server. Some of the notes have been re-written, but I could have forgotten something – so take the following information with a grain of salt maybe. Prepare to adopt to your needs.
Install hugo from source #
This is done on your computer.
Requirements #
Install Git
Depending on your OS, this might look like one of those:
$ sudo apt install git$ sudo pacman -S gitInstall Go version 1.18 or later
See above for the syntax, this package may be called
golangon some distributions (I think Ubuntu/Debian for example).Update your PATH environment variable as described in the Go documentation
Now, that looks like this:
if [[ -d $HOME/go ]]; then
  export GOPATH="$HOME/go"
  path=(
    $GOPATH/bin
    $path
  )
fi
That is an example taken from my
.zprofilefile.
Install hugo #
We are still on our computer.
$ go install -tags extended github.com/gohugoio/hugo@latest
That installs the latest version of hugo into $HOME/go/bin. If your terminal
does not recognize the new binaries: hash -r or rehash might help…
Source: https://gohugo.io/installation/linux/#build-from-source
Adding themes as hugo modules #
Just to be more clear on this: I’m using the congo theme for hugo right here.
From your project directory, initialise hugo modules:
$ hugo mod init github.com/<username>/<repo-name>
Create config/_default/module.toml and add the following:
[[imports]]
path = "github.com/jpanther/congo/v2"
Start your server using hugo server and the theme will be downloaded
automatically.
Remove the file config.toml from your website root directory (generated by
hugo site new...). Copy the config files from the theme into config/_default/.
module.toml file you created above!You will find these theme config files in the Hugo cache directory, or download a copy from GitHub.
Follow the Getting Started instructions to configure your website.
Using Atom for feeds (replacing RSS) #
Define an appropriate media type and corresponding output format in config.toml:
[mediaTypes]
[mediaTypes."application/atom"]
suffixes = ["xml"]

[outputFormats.Atom]
mediaType = "application/atom"
baseName = "index"
isPlainText = false
Tell hugo to produce the home page in Atom and HTML (and JSON) formats,
also append this in config.toml:
[outputs]
home = [ "HTML", "Atom", "JSON" ]
Put an index.atom.xml template file in your layouts directory. You can use the
attached one as a starting point, don’t forget to edit the author element
appropriately or make it use the values from your config.
<feed xmlns="http://www.w3.org/2005/Atom">
  <title>{{ with .Title }}{{.}} on {{ end }}{{ .Site.Title }}</title>
  <link rel="self" href="{{ .Permalink }}"/>
  <updated>{{ .Date.Format "2006-01-02T15:04:05-0700" | safeHTML }}</updated>
  <author>
    <name>YOUR NAME HERE</name>
    <email>YOUR EMAIL ADDRESS</email>
    <uri>DEFINITIVE URI OF YOUR WEB SITE</uri>
  </author>
  <id>{{ .Permalink }}</id>
  {{ range first 15 .Data.Pages }}
  <entry>
    <title>{{ .Title }}</title>
    <link rel="alternate" href="{{ .Permalink }}"/>
    <id>{{ .Permalink }}</id>
    <published>{{ .Date.Format "2006-01-02T15:04:05-0700" | safeHTML }}</published>
    <updated>{{ .Lastmod.Format "2006-01-02T15:04:05-0700" | safeHTML }}</updated>
    <summary>{{ .Summary | html }}</summary>
  </entry>
  {{ end }}
</feed>
Source: https://gist.github.com/lpar/7ded35d8f52fef7490a5be92e6cd6937
Auto-clear Cloudflare cache on git push #
If we use Cloudflare, we want the cache to be cleared. We are still on our computer.
Requirements #
- A Cloudflare website (not pages)
- An API token on Cloudflare to let git clear your website’s cache (see below)
Cloudflare setup #
Create a file .cloudflarerc in your $HOME directory that contains those two
variables:
apikey=*********************************-******
id=********************************
You find them in your Cloudflare dashboard.
Click on Websites and continue with clicking your domain name.
Scroll down a bit and find your id on the right sidebar. It is called
Zonen-ID (within API). Below that is a link called Ihr API-Token erhalten.
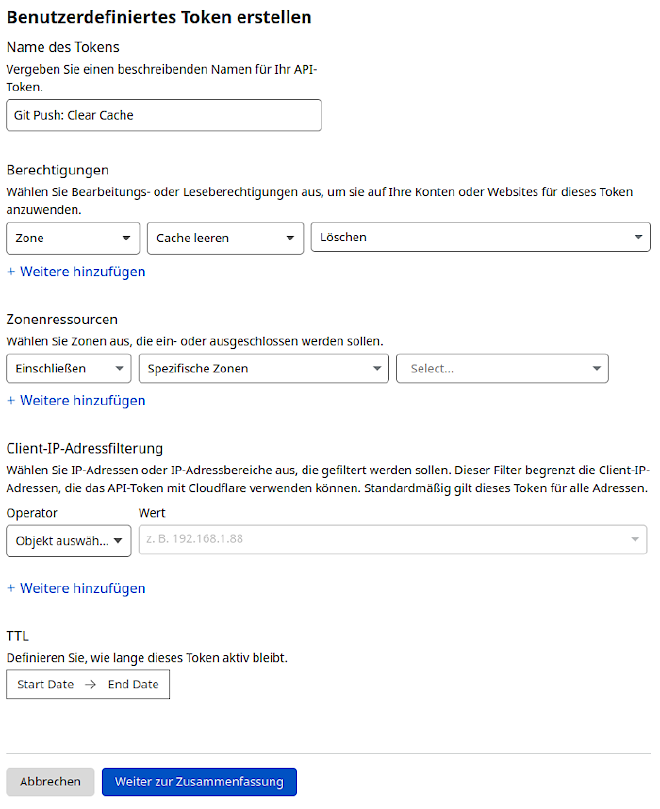
Click it and create a user-defined API token. I’ll show you a screenshot of
mine, edit yours to fit this example.

Click Create token and copy the resulting token into your
.cloudflarerc file.
git repository setup #
Now we need one last file in our git repository. Create .git/hooks/pre-push and
fill it with this:
#!/bin/bash

if ! [ -f ~/.cloudflarerc ] ; then
  echo "No ~/.cloudflarerc file found. Cloudflare clear cache SKIPPED."
  exit 0
fi

. ~/.cloudflarerc

echo -n "Clearing cloudflare cache..."

ret="$(curl -s -X DELETE "https://api.cloudflare.com/client/v4/zones/$id/purge_cache" \
     -H "Authorization: Bearer $apikey" \
     -H "Content-Type: application/json" \
     --data '{"purge_everything":true}')"

if [ -n "$(echo $ret | grep success)" ] ; then
  echo " Success!"
else
  echo " *** FAILED ***"
  echo "Could not clear cloudflare's cache. Update will not proceed."
  # exit with 1, so the update does not proceed, so we will know
  exit 1
fi
I found the script on https://www.supertechcrew.com/clear-cloudflare-cache-when-pushing-from-git-github-pages/ – which is also a good read if my explanation won’t work for you.
Don’t forget to make this script executable:
$ chmod +x .git/hooks/pre-push
Publish the website #
Since the end of December 2022 I use my own git hosting service on my own server. I used Github before that.
If you save your website repository on Github: create a Cloudflare page and you are probably good to go. Don’t forget to enable that page in the website settings at Cloudflare.
Okay, since I stopped using Github I have to publish my git repository somewhere to the public root of my webserver. That is done via a post-receive hook on the git servers repository.
It’s actually the file website.git/hook/post-receive.d/publish:
#!/usr/bin/env bash

# change these to your needs...
GIT_REPO=/var/.../website.git
WORKING_DIR=${HOME}/website-working
PUBLIC_WWW=/var/www/html
BACKUP_WWW=/var/www/backup
MY_DOMAIN=website.com

set -e

rm -rf ${WORKING_DIR}
rsync -aqz ${PUBLIC_WWW}/ ${BACKUP_WWW}
trap "echo 'A problem occured. Reverting to backup.'; rsync -aqz --del ${BACKUP_WWW}/ ${PUBLIC_WWW}; rm -rf ${WORKING_DIR}" EXIT

git clone ${GIT_REPO} ${WORKING_DIR}
rm -rf ${PUBLIC_WWW}/*
/home/git/go/bin/hugo --gc --minify --cleanDestinationDir -s ${WORKING_DIR} -d ${PUBLIC_WWW}
rm -rf ${WORKING_DIR}
trap - exit
If you use Gitea, those repositories are per default in
/var/lib/gitea/data/gitea-repositories/…
That is it, basically.